
 This post contains affiliate links. If you click on the link and buy something, I will receive a teensy commission. Not that Ikea is paying me a commission. Do they even do that? I don’t know but there might be something else for you to click, so I’m putting this out there. For more information, please see my disclosure page.
I’m totally in love with Ikea PAX wardrobes! If you’ve been reading my posts lately, I’m sure you’re already aware! PAX looks great on its own and is super functional, but if you’re willing to go the extra mile, you can make Ikea PAX look like custom cabinetry.
 Not gonna lie, it takes some time and effort to get a custom look. But, it’s soooo worth it! If you’re considering tackling a project like this, check out my free closet planner printable.
and subscribe to my newsletter. You’ll get access to the amazing free resource library, including the closet planner.
Why Build It In?
It all starts with the baseboard. If you assemble the PAX frame, then put it in against a wall, it doesn’t sit flush because the baseboard trim stands out from the wall. This leaves a weird gap behind the frame where dust and who knows what else, can collect.
When you search Pinterest, the pictures of PAX just sitting in the closet feel kind of temporary. Yes, it’s way better than cruddy wire shelving, but it doesn’t give that “dream closet” look that we’re after.
Luckily, my husband is pretty handy so building the wardrobe in was doable. Yay! Here’s how we did it…
Step 1: Clear Out
Take everything out of the closet. This will make a huge mess out of some other area of your home. Be prepared for it to take quite awhile, so try to put everything somewhere accessible, but out of the way. I borrowed a couple of clothes racks from my neighbors for the things that we were wearing every day.
This is probably a good time to get rid of some things. When you’re pulling clothes out, think about the last time you wore each item. If it’s been more than a year, put it into a donate pile and out it goes!
Pro tip: this is a great time to get rid of things that you don’t like. Like that “I’m With Stupid” shirt your husband pulls out when you say you want to go to Disney on spring break. Boom, it’s gone!
Step 2: Create a Clean Palette
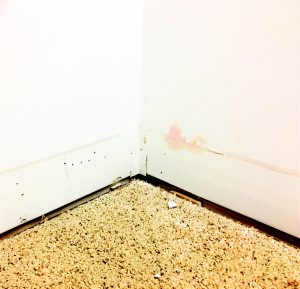 Now that the closet is empty, it’s demo day! Pull all of the existing shelving out, as well as the baseboard trim. Remove the trim carefully, because you can probably reuse at least some of it.
 The bases you will be building need a flat surface to sit on, so if you have carpet, you may need to remove some of it. We cut the carpet and left a three-inch margin so that the carpet could be re-stretched and tacked back down. Be sure to take the tack strip up too.
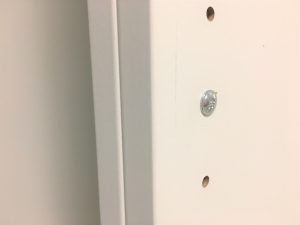
 Fill all of the holes left when you took the shelves down. Some of them will probably be covered up by the new PAX, but it’s easier just to fill them so you don’t have to worry. I had a ton of holes, so I used spackle, then sanded.
Step 3: Plan, Measure and Mark
This is the time to get the awesome floorplan that you created using the Ikea PAX Planner. It will have all of your measurements, including the measurements of all of the frames. Using masking tape, mark out where each base will go. If you need a step-by-step guide on using the planner, check here.
Taking the time to mark everything will give you a last check before you start cutting wood. In the interest of transparency, we didn’t do this but I sure wish we would have! See how much grief I’m saving you?
Step 4: Build Bases
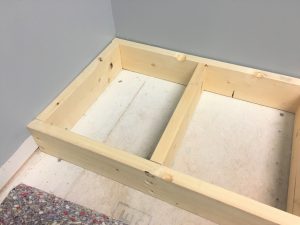 Just removing the baseboard and leaving the PAX on the floor won’t give you a custom look. You have to raise the wardrobes so that the baseboard will go around them and not cover up the bottom of the frame. This means building platforms for the Ikea frames to sit on.
We used two by fours, which were the perfect height for the baseboard trim to run along. We created frames 22 7/8″ deep. Building one long platform wasn’t an option because we couldn’t get the lumber up the stairs and around the corners, so we had to build a couple, ending up with the exact length of the frames that would be installed on top. Crossbeams were added in the middle for stability. Each platform is screwed into the subfloor and wall studs. A piece of plywood is screwed on top, giving a flat, sturdy base.
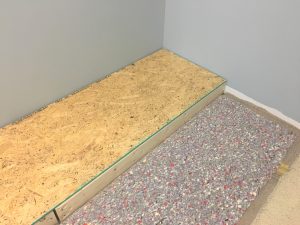 Pro tip: be sure to install your platforms first so you can screw them into place before you cover up the big hole with plywood.
I know reading this makes it seem kinda easy, but it’s not. In reality, it took a good two days and several trips to Lowe’s. There’s no real blueprint because every closet is different. You kind of have to figure it out as you go. Accurate measurements and cuts are key!
Step 5: Paint
 After you have the bases built and installed, it’s a good time to paint. You don’t have to paint the entire wall, as the PAX wardrobes have a back, but give yourself plenty of room for error! You don’t want to get the bases all installed, only to realize that there is a big patch of wall that needs paint.
If you need tips on painting, check out this post.
Step 6: Assemble Ikea PAX Frames
 I was absolutely giddy at this point! Assembling all of the frames is a huge step towards the finish line.
All of the Ikea PAX frames are 22 7/8″ deep, 93 1/8″ tall and the large ones are 33 1/4″ wide, so they are big. We had to assemble them in the closet in order to get them in place. Start at the back and work your way forward, placing each frame on the platform when it’s together.
When you have checked and double checked the plan and each frame is in place, screw each one to the platform to make sure it doesn’t go anywhere. Also screw the frames to one another.
Step 7: Install Accessories
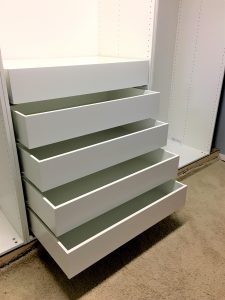 Slowly but surely, your dream closet is coming to life! Now you get to add all of the fun accessories, like drawers, shelves and racks.
This is another time you want to measure and mark before you get started. The frames are now elevated four inches off the floor, making them 97 1/8″ tall. I can’t reach the top, so I needed to find out how high I could reach to put the racks. Also, I wanted to be able to see in the drawers, so I needed to measure that too.
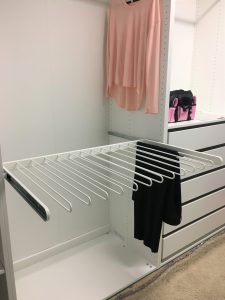 If you’re making two rows of hanging space, measure the longest item that will be on the top rack so that it doesn’t cover up the lower rack. For the pants hangers, get a pair of pants and make sure they won’t drag the floor.
Pro tip: count the holes, don’t use the tape measure. All of the Ikea accessories use the little holes inside of the frames to attach. It’s a lot easier to just count the holes from the top or the bottom. Use sticky notes to mark each spot and label it with the accessory that goes there.
This is an OCD-friendly activity!
Step 8: Add Trim
I know this feels like Step 800, not eight, but we’re getting there! It’s time to add crown molding, baseboard and facing trim. Being totally honest, this step is a bitch. You need to be very exact and patient. There will be cussing, there may be tears, but it can be done.
 Check out YouTube for some good videos on installing crown molding. Even though John had done crown before, he learned some things to make the job a little easier. Expect a little waste and a couple of trips to Lowe’s.
Baseboard trim is easier to work with because it’s not angled. Just make sure you have a tight fit. Caulk is your friend if you have some small gaps.
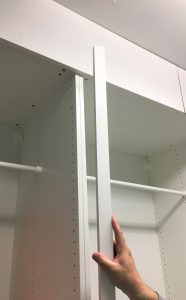
The facing trim is really what finishes the project and makes Ikea PAX look like custom cabinetry. We used a finish nailer to install one-by-two trim, covering the fronts of the frames.
Step 9: Caulk and Paint
Or paint and caulk, whatever. I paint all of the trim with two coats of shiny, high-gloss white. Then, I go back and caulk to cover any gaps. If you’re not a very good caulker, you should probably caulk first.
Tada! You have yourself an amazing dream closet, courtesy of Ikea PAX, sweat and tears. Next week we’ll have the big reveal and talk about what to put back in this gorgeous space.
Hey, if you loved this post, I would appreciate it so much if you would save it to Pinterest!


Can’t wait to see big reveal!! You are so right…there are always multiple trips to Lowe’s involved:( It’s when the people at Lowe’s know you and your kids by name, it’s time to wrap it up!!
I think the cashiers at Lowe’s we’re happy when we finished!
This is a great way to put the WOW in your closet. Well done, guys!
Darlene @ Castle Revival recently posted…Chalk Painting Tutorial for Side Tables
Thanks, Darlene! I absolutely love it!
We are trying to add the trim but can’t find any that fits the width we need. Did you have lowe’s Cut it to size?
We were able to find what we needed. What size are you looking for? I may have some ideas!
We have 2 large gaps – on top and on the side. We need a 3.5 inch trim at least on top and a 3-3.25 inch on the side. And they have to be the same width so they look flush together. AND we don’t have table or miter saw (and no budget to get it) to just cut something we need to size. So I have to work with whatever Home Depot/Lowe’s can provide
Got it! What about layering two pieces? You could use a 3” piece and a piece of quarter round to cover the gap if it’s next to a wall.
I am doing this project this weekend! Thanks for all the tips! I love this one about the quarter round, I was trying to figure out what to use without getting a table saw and just using a hand one :).
Good luck!!
Such a great job! You’ve increased the functionality and the value of your home!! Would you mind sharing the approximate cost of this project?
The PAX items cost about $1500, then we spent another $700 or so on the materials to build it in. Not exactly cheap, but much less than a closet company or custom cabinetry.
Looks fantastic. I have been planning similar with the pax over the last month, planning on how to “build it in.”
You did some things I didn’t consider, I have a few questions if you don’t mind.
1.ive been planning my platform. I am confused on one point. Do you build the platform the exact height of the trim? Or do you take into account the base of the pax.? For example I believe the base of the pax is 3.5 inch’s. I have 5 1/4 trim. So build the platform 1 3/4 inch (3.5 + 1.75 = 5.25)?
2. In regards to the face trim you used. It appears there is a little bit of overhang into the functional part of the cabinet? Did this have any affect on the accessories that you put into the pax? Ie do the drawers function properly? Drawers can still be installed easily with the trim in place? I assume there is at least a half inch or so of play between the cabinet side and the drawers making this possible. But not having the units yet, I was curious.
Again, your closet looks beautiful and well done. Thank you for posting this and I appreciate your time in reading my post.
Good questions, Sean!
1. We built the platforms not wanting to rip any boards down. Ours is built with 2x6s and we added another piece of facing trim to cover any gaps, with the baseboard on top of that.
2. The facing trim just comes into the usable space a tiny bit and it doesn’t get in the way of any of the accessories or drawers. There’s a half inch of clearance for the drawers.
Hope this helps. If you have any more questions, I’m happy to answer!
Hey Kim, Thanks for the previous response. I have another questions, I have been studying your pictures a little. Im curious, did you guys build the bases of the pax units a little different than instructed? It appears to be less thick at the bottom and there is a small piece of what appears to be 1 x 3 at the bottom rear of the units… were you trying to get the units to sit more flush with the platform?
Good eye, Sean! I had kind of forgotten about that! We wanted the bottom to sit flush and that left a gap in the back that we covered with a piece of trim.
Kim. Never got a chance to thank you. I finished mine last year after I asked this question and we love it. You were a guiding inspiration. I’d be happy to send pics if you or anyone else is interested. Thanks again
Please do!! I would love to see pictures! Thanks for your kind words.
How did you build the pax without that elevated base that the instructions describe?
Thanks for asking this. It’s a super critical piece of info!!
I may have missed it – on your last post you said you had 6 1/2″ inches of space leftover… what did you do to fill that space? I’m wondering because I will have about 7″ to fill in my opening. Great post!! Looks fantastic!
Thanks, Carissa! We used piece of 1x 10 and ripped it down to fit. It’s at the back of the closet, so it’s not very noticeable. We considered making it some kind of slide out shelf, kind of like a pantry but we were kind of tiring out by then!
Awesome, Kim… (Catching up on my blog reading, can you tell?!) Good job on this!
Thank you so much for posting this. We’re building a new house and I actually really like the ikea pax system– price, quality and all the options… but I would love to jazz them up a bit with some molding, so happy to see how it can be done. What paint did you use to match the white? Thanks again!
I just used bright white, right off the shelf at Lowe’s. Good luck!
Love these, and to echo everyone else; great job! Could you share the brand/type of paint? Was it for cabinets, satin? Etc. Thank you!
I didn’t actually paint the PAX. I used Sherwin Williams, bright white, high gloss for the wooden trim pieces we applied to finish the closet. Thanks for the kind words!
Hi Kim, it would be awesome to see some final pics of the finished closets (or did I miss them somewhere in the post?)
Also, I’m in the process of finishing my Pax sytem now and am thinking of putting pulls on the drawers any thoughts.
Final pictures are in the next post! I think pulls would be so pretty. I just ran out of steam at the end!
Hey! Any idea how much this all costs? Is it budget friendly?
Where can I see the finished product? I am having a hard time finding it!
The reveal is titled, “Ultimate IKEA PAX Hack.” If you click on the related post, it’ll take you there. Thanks for checking us out!
An you post pictures of finished closet with crown molding?
Love the idea and I’m just starting to turn my spare room into my closet and got the ikea furniture
What material did you use for the face frame material?
Sorry to revive an old thread, but I am confused about whether you used your platform base (fronted with your baseboard, instead of the PAX plinth and legs, putting the PAX base/bottom directly in the bottom holes instead of the third hole from the bottom and screwing this directly onto the plywood platform cover?
And, am I seeing it correctly that you built your platform slightly deeper than the wardrobes themselves and used quarter-trim to blend them?
I can’t see the finished product? Is there another blog post ?
Thanks
Any issues with using a finish nailer to attach trim on front of the pax frames? The ikea frame is not real wood so wondering if using nailer split the wood. What size nail did you use?
Hi, we are receiving our cabinets tomorrow, the hight of our room is 96”
Im concerning if i can put the base with the 2×4 and the baseboard, also put the crown molding.
What is your room hight?
I just came across this post as this is what we’re hoping to do with our closet. I was wondering for the trims, did you get a finished melamine base board and cut them all to size or were they wood and you painted over them? Appreciate this post and details.
This is amazing information and really helping this learning blog thanks for sharing this wonderful article and informative article
I would love to see another ikea like design. What do you have for floating shelves?
I absolutely love this idea of making Ikea PAX wardrobes look like custom cabinetry! It’s amazing how some crown molding and baseboard trim can completely transform a space. As someone who is always looking for ways to improve the look and functionality of my home, I appreciate the step-by-step guide provided in this post.
Clearing out the closet and getting rid of things that are no longer worn is definitely a great idea, and one that I need to implement in my own space. I also appreciate the pro tip about getting rid of things that aren’t liked or worn. It’s amazing how much space can be freed up by getting rid of unnecessary items.
Overall, this post has inspired me to take on a similar project in my own home. Thank you for sharing your experience and providing such detailed instructions. I can’t wait to see the finished result!
ebb9me
I’m about to do this myself and I am wondering if the 2” wide trim was ever a problem since it’s wider than the PAX it’s covering (mine measures about 1.5” wide. Did you just center it and call it good?
301 Moved Permanently https://ihr-kindergeld.de – 301 Moved Permanently!
Buying a new elbow-room door can be an galvanizing but also challenging project. The cost of a live door can be influenced by numerous factors. Here we purposefulness look at the most vital aspects that judge the price so that you are articulately au fait when making your purchase. – Materials and designs – Price row – Fitting costs – Tips in the service of choosing Materials and designs Materials and designs action a crucial capacity when buying a original room door. The choice of apparatus not solely influences the appearance, but also the durability and price. Here are some of the most garden-variety materials: Colourless doors are acutely popular because they tender a prototypical look and accept worthy pronounce insulation. Solid wood doors are more extravagant, but tender greater resolve and durability. There are also veneered impassive doors, which are less overpriced but hush proposition an sophisticated awkward look. Different types of wood such as oak, pine or beech bid opposite colours and grains. Beaker and glazed doors are complete for rooms that be in want of a group of light. They are present in another designs, from clear to frosted or cool with decorative engravings. Anyhow, glass doors can tender less secrecy and are more susceptible to breakage. Protection telescope can be a upstanding alternative here to minimise the imperil of injury. Metal doors tender a contemporary and industrial look.
This guide on transforming Ikea PAX into custom cabinetry is brilliant! It’s amazing how a few creative touches can elevate simple pieces to look high-end. For those working on small spaces, pairing these custom cabinets with small bedside cabinets can create a cohesive and functional look. Love the blend of affordability and style—truly inspiring for any modern home!
Impressive kitchen transformation! Eric recently shared some great tips in his
post about cleaning range hood filters. It’s amazing how maintaining even the smallest details,
like range hoods or a href=”https://goiconickitchen.com/how-to-clean-kitchen-cabinets-wood-ultimate-guide/”>Kitchen Cabinets Wood, can make a huge difference!”
My heart aches recalling how a fraudulent Bitcoin investment cost me $485,000. After a job loss, this was everything for our family business and a new home. The scammer’s promises of massive profits felt so convincing, making the eventual realization of deceit utterly crushing. The pain of that betrayal and the fear of losing our dreams were overwhelming.
In that darkness, finding Hexrevoker was a lifeline. They listened with such genuine compassion to my despair. With breathtaking skill, they didn’t just recover my initial $485,000 but also the significant ‘profits’ the con artist had dangled before me. They mended more than just finances; they restored my hope and our family’s future.
I wholeheartedly recommend Hexrevoker to anyone devastated by such scams. They are truly exceptional. Thank you, Hexrevoker, for your life-changing support!
CONTACT THEM VIA:
EMAIL: hexrevoker@gmail.com
TELEGRAM: @hexrevoker
this post is very informative .i really like this post .
Love how this post balances DIY options with professional solutions. It makes me feel empowered to start small but also informed enough to call in experts if needed. Very motivating read
Bucktown Grading and Construction recently posted…Yard Sloping Toward Your House? Here’s How to Fix It
and you don’t know how to set up a printer, but you’ve found an instruction that can help you. веб студия|
8cz3f0
This is such an inspiring and detailed DIY guide! I really appreciate how clearly the process of transforming IKEA PAX units into custom-looking cabinetry is explained. The tips about building platforms, adding trim, and finishing with paint truly show how thoughtful design and effort can turn affordable furniture into a stunning built-in feature.
john smith recently posted…What Is Kohler LuxStone?
Beautiful transformation and a great example of how thoughtful design choices can completely elevate a space. I particularly like how the project combines functionality with aesthetics, creating a custom look without the need for a fully bespoke installation. Well-planned storage solutions not only improve organisation but also contribute to a cleaner and more cohesive interior design. The before-and-after results are truly inspiring and show how creativity and attention to detail can make a significant impact. Thank you for sharing the process and the valuable tips behind this impressive makeover.
Amazing makeover and a fantastic example of how smart storage solutions can completely transform a space. What I appreciate most is the way the design combines practicality, organisation, and visual appeal. Well-planned cabinetry and storage systems help maximise available space while creating a clean and seamless look throughout the room. The attention to detail in achieving a custom-built appearance is truly impressive. Projects like this show how effective storage planning can enhance both functionality and aesthetics. Thank you for sharing the process and the inspiration behind this beautiful transformation.
jyrcjx